
Your self-hosted analytics instance goes down on a Friday afternoon. The database volume is corrupted, the last backup you think you have is nine months old, and you have no idea whether it actually restores cleanly because you never tested it. That is not a hypothetical. That is exactly what happens when people treat self-hosted software as “set it and forget it.”
Self-hosted analytics backup is not a one-time task. It is an ongoing maintenance discipline — a combination of regular database dumps, tested restore procedures, controlled upgrade processes, and basic monitoring. Get it right and your data survives hardware failures, botched upgrades, and accidental deletions. Get it wrong and you start over.
This guide covers the full picture: what to back up in Matomo, Umami, and Plausible, how to schedule and verify those backups, how to upgrade without data loss, and what to monitor so you catch problems before they become disasters. I won’t touch performance or scaling — that belongs in a separate discussion — but I’ll link over to our self-hosted analytics scaling guide when you’re ready to go in that direction.
What You Actually Need to Back Up
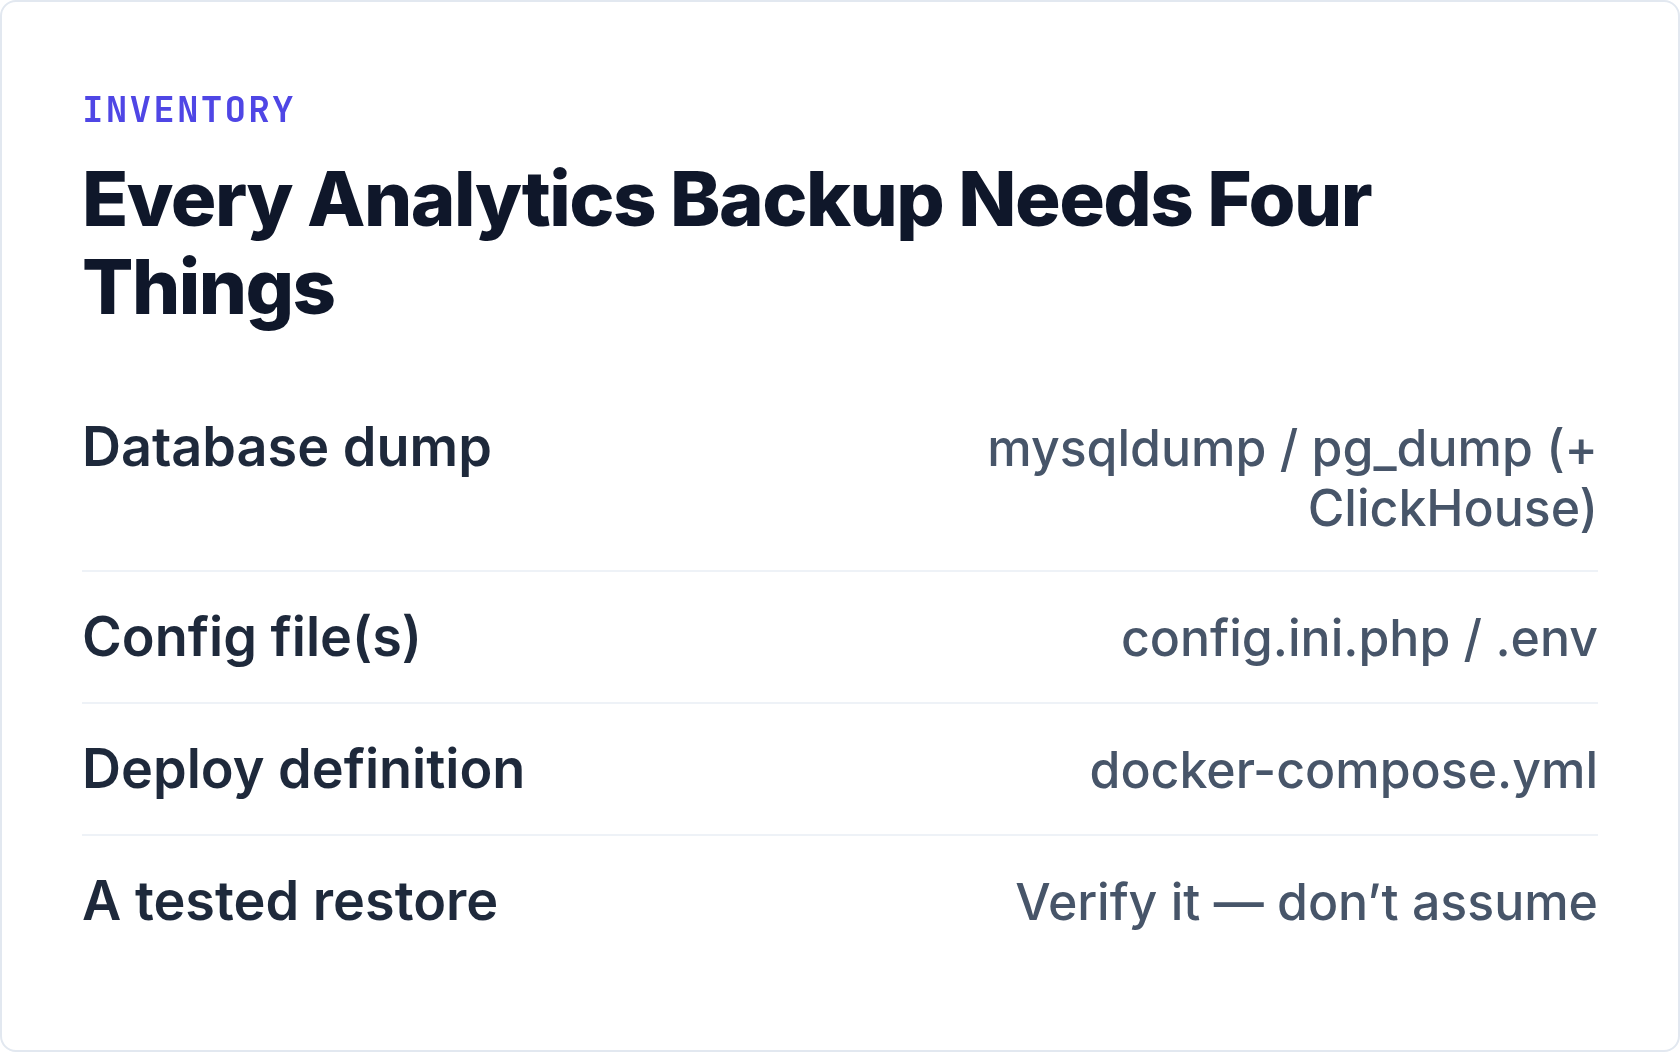
Most people immediately think “database.” That’s correct, but it’s not the complete list. A self-hosted analytics stack has three or four distinct components, and losing any one of them can cost you hours of recovery work.
Here is the full inventory:
| Component | Matomo | Umami | Plausible |
|---|---|---|---|
| Database (primary data) | MySQL / MariaDB | PostgreSQL or MySQL | PostgreSQL + ClickHouse |
| Application config | config/config.ini.php |
.env file |
plausible-conf.env |
| Custom plugins / themes | plugins/ directory |
Not applicable | Not applicable |
| SSL certificates | Nginx/Apache config | Nginx/Caddy config | Nginx/Caddy config |
| Docker Compose files | If containerized | docker-compose.yml |
docker-compose.yml |
Plausible is the most complex case. It runs two databases: PostgreSQL stores user accounts, site configurations, and goals; ClickHouse stores the actual event data. You need to back up both, or you’re only half-protected.
Keep your config files in version control. A Git repository with your
docker-compose.yml,nginx.conf, and env files (minus actual secrets) means you can rebuild the infrastructure from scratch in under 30 minutes. Your database backup covers the data.
Database Dumps: The Commands That Matter
There’s nothing exotic about backing up these databases. Standard tools work fine. The key is running these commands consistently and storing the output somewhere sensible.
Matomo on MySQL / MariaDB
Matomo’s database contains everything: archived reports, raw log data, user accounts, segment definitions, and goal configurations. Back up the entire database.
mysqldump \
  --single-transaction \
  --routines \
  --triggers \
  --hex-blob \
  -u matomo_user \
  -p'your_password' \
  matomo_db \
  | gzip > /backups/matomo/matomo-$(date +%Y-%m-%d).sql.gz
The --single-transaction flag is important for InnoDB tables — it takes a consistent snapshot without locking the database during the dump. Without it, you risk a backup taken mid-write, which can produce corrupted data. Full details on mysqldump options are in the official MySQL documentation.
Also back up the Matomo application directory, specifically the config and plugins folders:
tar -czf /backups/matomo/matomo-files-$(date +%Y-%m-%d).tar.gz \
  /var/www/matomo/config/ \
  /var/www/matomo/plugins/
Umami on PostgreSQL
If you followed a Docker setup — as covered in our Umami Docker setup guide — the database runs in a named volume. Dump it like this:
pg_dump \
  -U umami_user \
  -d umami_db \
  -Fc \
  -f /backups/umami/umami-$(date +%Y-%m-%d).dump
The -Fc flag produces a custom-format dump that compresses automatically and supports parallel restore with pg_restore. It’s the right format for any PostgreSQL backup you intend to restore later. The pg_dump documentation covers every available option.
If Umami is running in Docker, exec into the container or use the host-level connection:
docker exec umami-db pg_dump \
  -U umami_user \
  -Fc \
  umami_db > /backups/umami/umami-$(date +%Y-%m-%d).dump
Plausible: Two Databases, Not One
This is where people make mistakes. Backing up only PostgreSQL leaves you with user accounts and site configs but none of the actual visitor data. That lives in ClickHouse.
PostgreSQL dump (accounts, sites, goals):
docker exec plausible_db_1 pg_dump \
  -U postgres \
  -Fc \
  plausible_db > /backups/plausible/plausible-pg-$(date +%Y-%m-%d).dump
ClickHouse backup (all events):
docker exec plausible_clickhouse_1 clickhouse-client \
  --query "BACKUP DATABASE plausible_events_db TO Disk('default', 'backup-$(date +%Y-%m-%d)')"
Alternatively, for a simpler approach, back up the ClickHouse data directory directly via a volume snapshot if your infrastructure supports it. The Plausible self-hosting documentation has specific guidance for your version.
Automating Backups with Cron
A backup command you run manually is a backup you will eventually forget to run. Cron handles this for you. Here is a practical setup that runs nightly at 2 AM, keeps 14 days of daily dumps, and keeps one dump per week for 60 days.
Add this to root’s crontab (crontab -e as root, or drop a file in /etc/cron.d/):
# Self-hosted analytics backup — nightly at 02:00
0 2 * * * root /usr/local/bin/analytics-backup.sh >> /var/log/analytics-backup.log 2>&1
And the script at /usr/local/bin/analytics-backup.sh:
#!/bin/bash
set -euo pipefail

BACKUP_DIR="/backups/analytics"
DATE=$(date +%Y-%m-%d)
RETENTION_DAILY=14
RETENTION_WEEKLY=60

mkdir -p "$BACKUP_DIR"/{matomo,umami,plausible}

# Matomo
mysqldump --single-transaction --routines --triggers --hex-blob \
  -u matomo_user -p'DB_PASS' matomo_db \
  | gzip > "$BACKUP_DIR/matomo/matomo-$DATE.sql.gz"

# Umami
docker exec umami-db pg_dump -U umami_user -Fc umami_db \
  > "$BACKUP_DIR/umami/umami-$DATE.dump"

# Cleanup: delete dailies older than 14 days
find "$BACKUP_DIR" -name "*.sql.gz" -mtime +$RETENTION_DAILY -delete
find "$BACKUP_DIR" -name "*.dump" -mtime +$RETENTION_DAILY -delete

echo "[$DATE] Backup completed successfully"
Make it executable: chmod +x /usr/local/bin/analytics-backup.sh.
A few things worth noting about this setup. The set -euo pipefail at the top means the script exits immediately on any error instead of silently continuing and producing empty files. The retention cleanup at the end prevents your disk from filling up with old dumps. For additional cron syntax reference, the crontab(5) man page is the canonical source.
For offsite copies, I recommend piping the completed backup to rclone toward any S3-compatible storage or a remote server. A backup that only exists on the same machine as the data it’s protecting is not really a backup.
Self-Hosted Analytics Backup Checklist
Use this table before and after any major change, and weekly as part of your maintenance routine:
| Task | Frequency | Status |
|---|---|---|
| Database dump (all DBs) | Daily (automated) | Automate via cron |
| Config files committed to Git or archived | On every change | One-time setup |
| Offsite copy (S3, remote server) | Daily (automated) | Add to backup script |
| Restore test from backup | Monthly | Manual — calendar it |
| Disk usage check | Weekly | Alert at 80% |
| Backup log review | Weekly | Check for errors |
| Retention policy verified | Monthly | Old files deleted |
| Pre-upgrade backup (manual) | Before every upgrade | Non-negotiable |
Testing Restores: The Step Nobody Does
In my experience, most self-hosters run backups for months without ever testing a restore. Then the first time they need it, they discover the dump file is empty, the credentials in the backup script were wrong, or the compressed file is corrupt. A backup you haven’t restored is a guess, not a safety net.
Testing a restore doesn’t require taking down your production instance. Spin up a temporary database, restore into it, and verify the data looks sane.
For MySQL (Matomo):
# Create a test database
mysql -u root -p -e "CREATE DATABASE matomo_restore_test;"

# Restore
gunzip -c /backups/matomo/matomo-2026-06-01.sql.gz \
  | mysql -u root -p matomo_restore_test

# Verify row counts match production
mysql -u root -p matomo_restore_test \
  -e "SELECT COUNT(*) FROM matomo_log_visit;"
For PostgreSQL (Umami, Plausible):
# Create a test database
createdb -U postgres umami_restore_test

# Restore
pg_restore -U postgres -d umami_restore_test /backups/umami/umami-2026-06-01.dump

# Spot check
psql -U postgres umami_restore_test \
  -c "SELECT COUNT(*) FROM website_event;"
Compare the row count against your live database. If the numbers are close (accounting for data written between the backup timestamp and now), the restore is working. Drop the test database afterward and note the result. Do this once a month, every month. Thirty minutes now prevents a real disaster later.
Safe Upgrade Procedures
Upgrades are where data loss actually happens in practice. A failed migration script, an incompatible plugin, or a botched Docker image pull can leave your database in a half-migrated state. The fix is always the same: take a backup immediately before upgrading, never during or after.
Matomo
Matomo runs database migrations automatically on first access after an update. That’s convenient and also dangerous if you haven’t backed up first.
- Take a fresh database dump and a tarball of
config/andplugins/. - Check the Matomo changelog for any migration notes or breaking changes.
- Put Matomo in maintenance mode: add
[General] maintenance_mode = 1toconfig/config.ini.php. - Replace the application files (or pull the new Docker image).
- Visit the admin URL — Matomo will run its migration scripts automatically.
- Verify dashboards load correctly, then remove the maintenance mode setting.
For containerized Matomo, the sequence is: dump → docker-compose pull → docker-compose up -d → check logs → verify UI.
Umami
Umami applies schema migrations on startup. With Docker, the workflow is clean:
# 1. Back up first
docker exec umami-db pg_dump -U umami_user -Fc umami_db \
  > /backups/umami/pre-upgrade-$(date +%Y-%m-%d).dump

# 2. Pull the new image
docker compose pull

# 3. Restart — migrations run automatically
docker compose up -d

# 4. Watch logs for migration completion
docker compose logs -f umami
If the migration fails, restore from the pre-upgrade dump and revert to the previous image tag. The full setup and upgrade context is in our Umami Docker setup guide.
Plausible
Plausible CE versions sometimes include ClickHouse schema changes, which are the most sensitive to roll back. Always read the release notes before pulling a new image. The upgrade sequence is identical to Umami — backup both DBs, pull, restart, verify — but treat ClickHouse backups as equally important as PostgreSQL.
Never run
docker compose pull && docker compose up -don a production analytics instance without a verified backup already on disk. The upgrade takes 30 seconds; the backup takes 2 minutes. There is no good reason to skip it.
Monitoring, Disk Space, and Staying Ahead of Problems
A running backup process can quietly fail for weeks. The cron job finishes with exit code 0 but writes an empty file because the database password changed. Or your disk fills up and the dump truncates silently. Monitoring catches these things before you need the backup.
Disk space
Analytics databases grow continuously. Matomo in particular accumulates raw log data aggressively if you haven’t configured archiving and log purge. A weekly df -h check is the bare minimum. For automated alerting, add this to your cron:
# Alert if disk usage exceeds 80%
0 8 * * 1 root USAGE=$(df / | tail -1 | awk '{print $5}' | tr -d '%'); \
  [ "$USAGE" -gt 80 ] && echo "Disk at ${USAGE}% on $(hostname)" | mail -s "Disk Warning" [email protected]
For Matomo specifically, you control data retention under Administration → Privacy → Data Retention. Setting a 12 or 24-month rolling window keeps database size manageable without losing meaningful historical data. For high-traffic sites, Matomo’s log processing can be run on a schedule to archive data and free raw log space.
Backup file freshness
Check that backup files are actually being written by monitoring their modification times. A simple shell check:
find /backups/analytics -name "*.dump" -newer /backups/analytics/.last_check \
  | wc -l
If the count is 0 on a day when it should be greater than 0, something broke. Add this check to your weekly review or wire it into a monitoring tool like Uptime Kuma or Netdata, both of which run fine on the same VPS as your analytics stack.
Service uptime
At minimum, check that your analytics endpoint responds on a schedule. A cron-based HTTP check is fine for solo setups:
# Simple HTTP health check — logs failure
*/15 * * * * root curl -sf https://analytics.yourdomain.com/ \
  || echo "$(date) analytics down" >> /var/log/analytics-health.log
For a broader picture of how your self-hosted setup performs under load and what to watch as traffic grows, our scaling guide for self-hosted analytics covers the infrastructure side in detail.
Retention Policy: How Long to Keep Backups
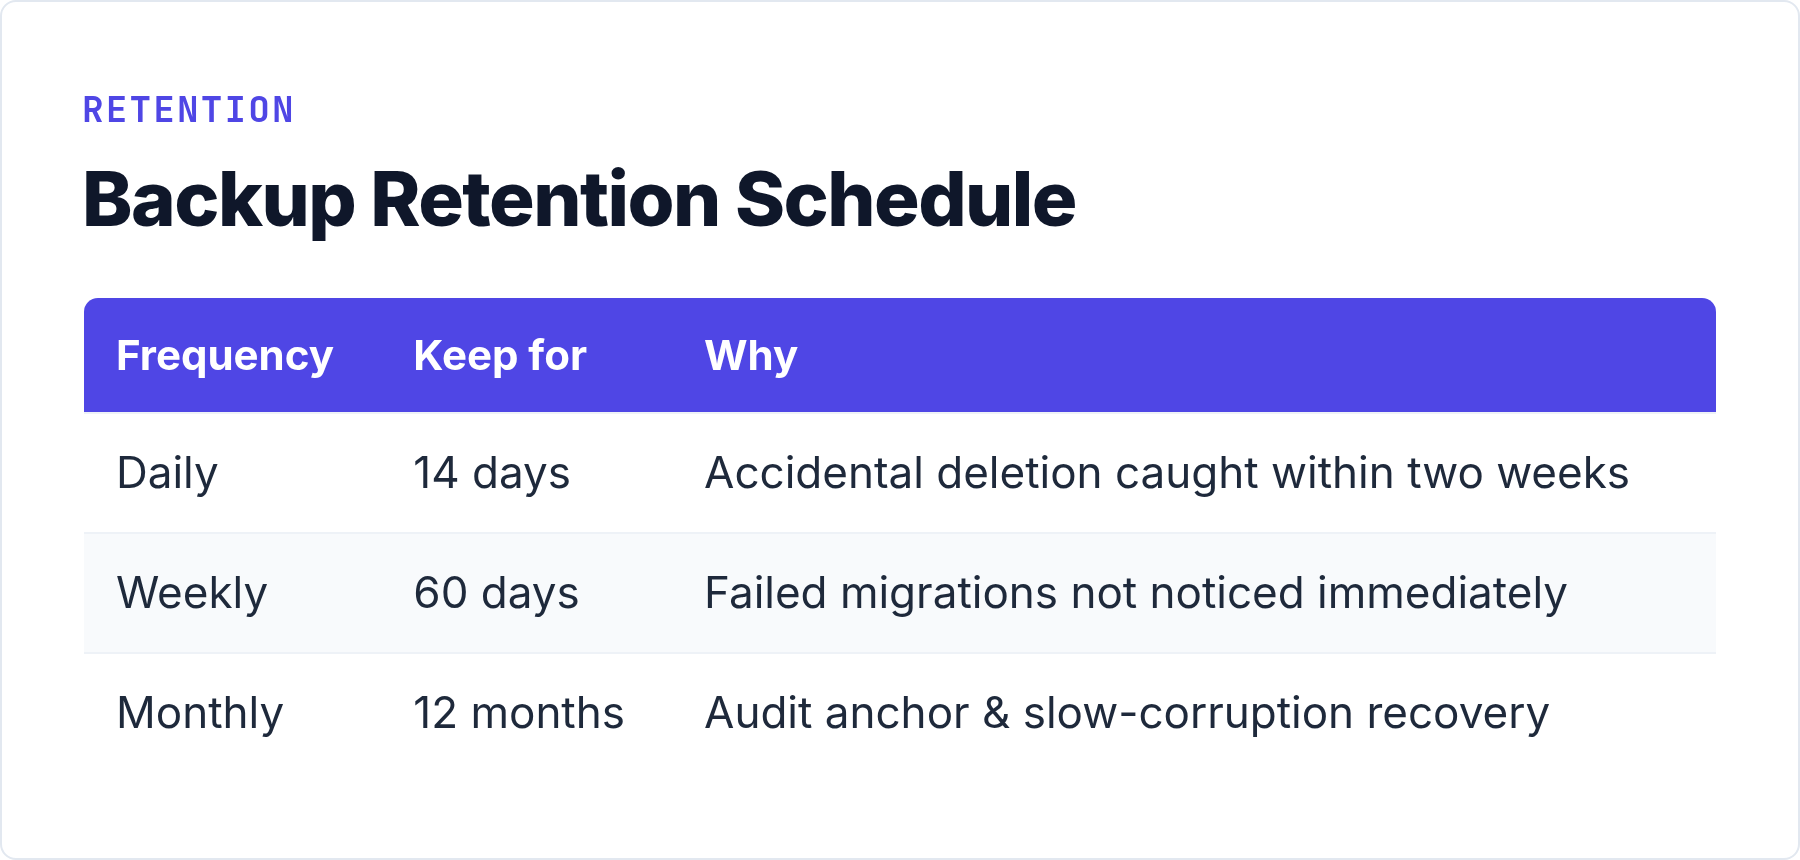
There’s no universally right answer, but here is the policy I actually use and recommend for single-server analytics setups:
- Daily dumps: keep for 14 days. This covers accidental data deletion discovered within two weeks.
- Weekly dumps: keep for 60 days. Run on Sunday, labeled clearly. This covers migrations gone wrong that weren’t caught immediately.
- Monthly snapshots: keep for 12 months. One dump per month gives you a point-in-time anchor for audit purposes or to recover from slow data corruption you didn’t notice for a while.
For most sites, 14 daily + 8 weekly + 12 monthly backups total is around 34 files. At typical compression ratios, a Matomo or Umami database for a site doing 100k monthly page views compresses to 50–200 MB per dump. That’s 7–10 GB total storage for a full year of backups. Easily manageable and worth every byte.
Common Mistakes to Avoid
After setting up and recovering from self-hosted analytics failures more times than I’d like to admit, these are the mistakes I see most often:
- Not backing up ClickHouse for Plausible. The PostgreSQL dump alone won’t restore your analytics history. Both databases matter.
- Storing backups on the same volume as the database. Disk failure takes both. Offsite or cross-server copies are not optional.
- Testing never happens. Schedule a monthly restore test. Put it on the calendar. It’s a 30-minute task that will save you at exactly the wrong moment.
- Upgrading without a pre-upgrade backup. Migrations can fail. Rollback without a clean backup is a manual, painful process.
- Ignoring backup log output. The cron job logs to
/var/log/analytics-backup.log. Read it weekly. Silent failures are the worst kind. - No retention policy. Six months of daily dumps at 200 MB each is 36 GB of space consumed. Automate deletion of old files.
Bottom Line
Self-hosted analytics gives you full control of your data. That’s the point. But full control means full responsibility — and responsibility starts with a working self-hosted analytics backup that you’ve actually tested.
The technical side is straightforward: mysqldump or pg_dump on a cron schedule, offsite copies, config files in version control. The discipline is harder — running restore tests monthly, reviewing logs weekly, taking a pre-upgrade backup every single time without exception.
Build the habit now. The one time you need it, you’ll be glad you did. For everything outside the scope of this guide — how to get your analytics setup off the ground in the first place — the complete self-hosted analytics guide is the right starting point.